SSM(SpringMVC + Spring + Mybatis)框架是继经典的SSH框架之后的又一有力组合,在这里我将从零搭建一个SSM框架以做示范。
项目环境:
Ubuntu 14.04.3
Intellij IDEA 15.0.2
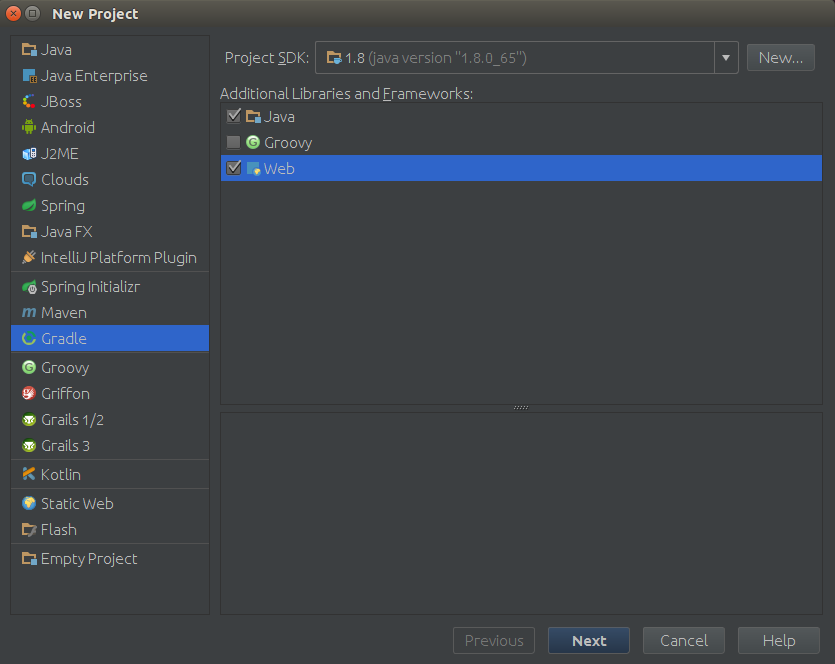
1. 创建项目: 1) 打开IDEA,点击Create New Project,在左侧边栏找到Gradle,并勾选Java和Web,如图:
2) 点击Next后,GroupId可以填写为包名,这里我写为com.fatesolo;ArtifactId可以填写为项目名,这里我写为SSM-Test;Version不需要变动。
3) 点击Next后,勾选Use auto-import和Create directories for…,Gradle使用第一种推荐的方式即可。
4) 点击Next后,直接Finish即完成了项目的创建。
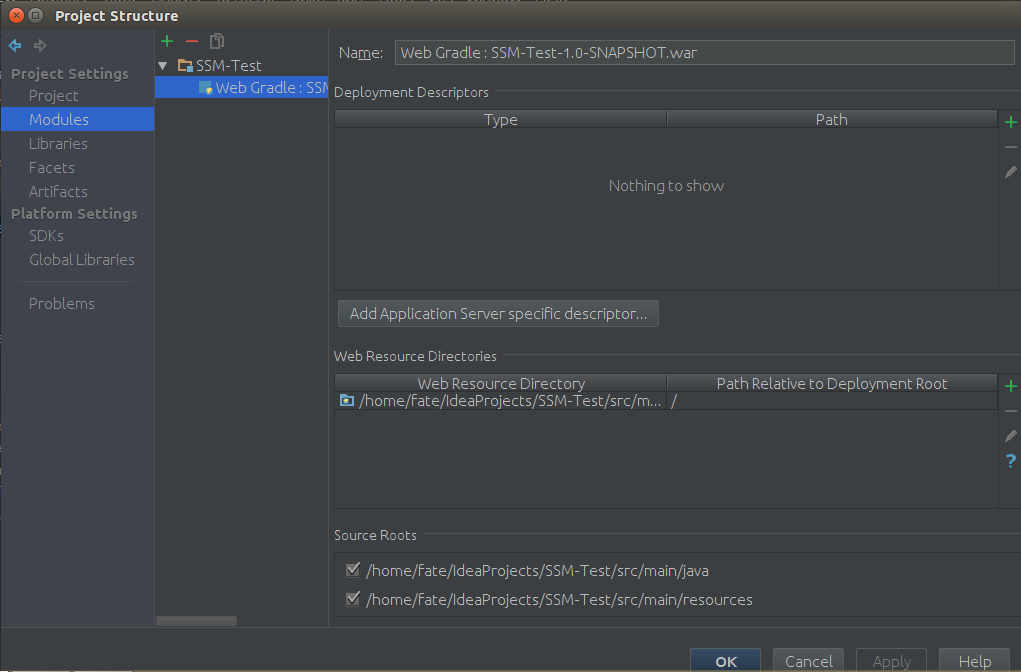
2. 基础配置 1) 点击File -> Project Structure,选择Modules,在SSM-Test下选择Web Gradle…,如图:
2) 点击Deployment Descriptors栏右侧的绿色加号,点击web.xml,在弹出的对话框中,在SSM-Test与WEB-INF路径之间添加src/main/webapp/,点击确定即完成了web.xml的创建。
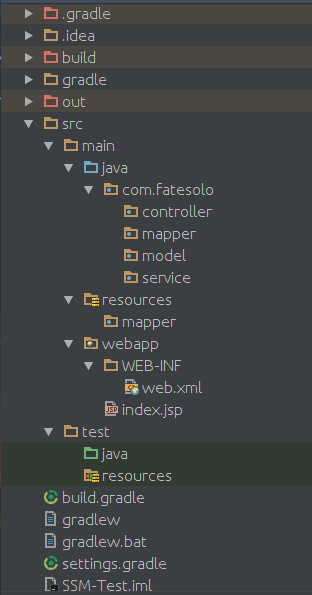
3) 在src/main/java中创建com.fatesolo,并创建controller(控制器层), service(业务逻辑层), mapper(数据访问层,命名为mapper是因为使用了Mybatis框架,该层不再实现具体逻辑,而是只写为接口形式供xml文件映射), model(模型层)四个子包。
4) 在src/main/resources中创建mapper文件夹,该文件夹主要存放实现数据访问层具体逻辑的xml文件,一般一个xml对应一个mapper子包中的接口。至此,基础配置完成,项目目录结构如图所示:
3. 编写web.xml 1) 打开web.xml,编写如下配置:1 2 3 4 5 6 7 8 9 10 11 12 13 14 15 16 17 18 19 20 21 22 23 24 25 26 27 28 29 30 31 32 33 34 35 36 37 38 39 40 41 42 43 44 45 46 47 48 49 50 51 52 53 54 <?xml version="1.0" encoding="UTF-8"?> <web-app xmlns ="http://java.sun.com/xml/ns/javaee" xmlns:xsi ="http://www.w3.org/2001/XMLSchema-instance" xsi:schemaLocation ="http://java.sun.com/xml/ns/javaee http://java.sun.com/xml/ns/javaee/web-app_3_0.xsd" version ="3.0" > <context-param > <param-name > contextConfigLocation</param-name > <param-value > classpath:spring-common.xml</param-value > </context-param > <listener > <listener-class > org.springframework.web.context.ContextLoaderListener</listener-class > </listener > <servlet > <servlet-name > springMVC</servlet-name > <servlet-class > org.springframework.web.servlet.DispatcherServlet</servlet-class > <init-param > <param-name > contextConfigLocation</param-name > <param-value > classpath:spring-mvc.xml</param-value > </init-param > <load-on-startup > 1</load-on-startup > </servlet > <servlet-mapping > <servlet-name > springMVC</servlet-name > <url-pattern > /</url-pattern > </servlet-mapping > <filter > <filter-name > encodingFilter</filter-name > <filter-class > org.springframework.web.filter.CharacterEncodingFilter</filter-class > <init-param > <param-name > encoding</param-name > <param-value > UTF-8</param-value > </init-param > <init-param > <param-name > forceEncoding</param-name > <param-value > true</param-value > </init-param > </filter > <filter-mapping > <filter-name > encodingFilter</filter-name > <url-pattern > /*</url-pattern > </filter-mapping > </web-app >
2) 编写中会发现存在找不到class的情况,这是因为尚未导入相关包的缘故。因为使用了Gradle作为项目构建工具,因此可以通过Gradle方便的导入相关包。打开build.gradle文件,注意此时需要联网。
3) 在dependencies中,加入如下两句话:1 compile 'org.springframework:spring-web:4.2.4.RELEASE'
compile 'org.springframework:spring-webmvc:4.2.4.RELEASE'
等待Gradle自动构建完成后,可以看到相关class已经可以找到。
4. 编写相关配置文件 1) 在web.xml中,可以发现找不到spring-common.xml和spring-mvc.xml,它们分别是Spring和SpringMVC的配置文件。在src/main/resources中新建并命名这两个文件。
2) 在编写这两个配置文件之前,首先创建并编写jdbc.properties文件,代码如下:1 jdbc.driverClassName=com.mysql.jdbc.Driver
jdbc.url=jdbc:mysql://localhost:3306/TestDB
jdbc.username=root
jdbc.password=123456
注意数据库名、用户名和密码都更改成你自己的。
3) 打开spring-mvc.xml,编写如下配置:1 2 3 4 5 6 7 8 9 10 11 12 13 14 15 16 17 18 19 20 21 22 <?xml version="1.0" encoding="UTF-8"?> <beans xmlns ="http://www.springframework.org/schema/beans" xmlns:xsi ="http://www.w3.org/2001/XMLSchema-instance" xmlns:context ="http://www.springframework.org/schema/context" xmlns:mvc ="http://www.springframework.org/schema/mvc" xsi:schemaLocation ="http://www.springframework.org/schema/beans http://www.springframework.org/schema/beans/spring-beans.xsd http://www.springframework.org/schema/context http://www.springframework.org/schema/context/spring-context.xsd http://www.springframework.org/schema/mvc http://www.springframework.org/schema/mvc/spring-mvc.xsd" > <context:component-scan base-package ="com.fatesolo" /> <mvc:annotation-driven /> <bean id ="viewResolver" class ="org.springframework.web.servlet.view.InternalResourceViewResolver" > <property name ="prefix" value ="/WEB-INF/jsp/" /> <property name ="suffix" value =".jsp" /> </bean > </beans >
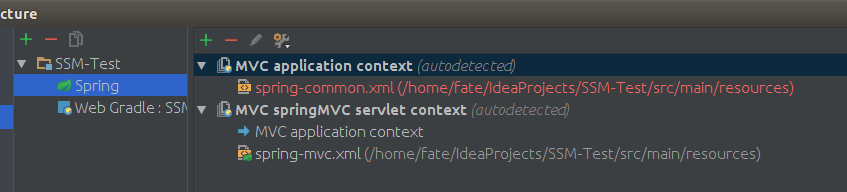
4) 此时发现IDEA给出了如下图提示:
5) 打开spring-common.xml,编写如下配置:1 2 3 4 5 6 7 8 9 10 11 12 13 14 15 16 17 18 19 20 21 22 23 24 25 26 27 28 29 30 31 32 33 34 35 36 37 38 39 40 41 42 43 44 45 46 47 <?xml version="1.0" encoding="UTF-8"?> <beans xmlns ="http://www.springframework.org/schema/beans" xmlns:xsi ="http://www.w3.org/2001/XMLSchema-instance" xmlns:context ="http://www.springframework.org/schema/context" xmlns:tx ="http://www.springframework.org/schema/tx" xsi:schemaLocation ="http://www.springframework.org/schema/beans http://www.springframework.org/schema/beans/spring-beans.xsd http://www.springframework.org/schema/context http://www.springframework.org/schema/context/spring-context.xsd http://www.springframework.org/schema/tx http://www.springframework.org/schema/tx/spring-tx.xsd" > <context:component-scan base-package ="com.fatesolo" /> <bean id ="propertyConfigurer" class ="org.springframework.beans.factory.config.PropertyPlaceholderConfigurer" > <property name ="locations" > <list > <value > classpath:jdbc.properties</value > </list > </property > </bean > <bean id ="dataSource" class ="org.springframework.jdbc.datasource.DriverManagerDataSource" > <property name ="driverClassName" value ="${jdbc.driverClassName}" /> <property name ="url" value ="${jdbc.url}" /> <property name ="username" value ="${jdbc.username}" /> <property name ="password" value ="${jdbc.password}" /> </bean > <bean id ="sqlSessionFactory" class ="org.mybatis.spring.SqlSessionFactoryBean" > <property name ="dataSource" ref ="dataSource" /> <property name ="typeAliasesPackage" value ="com.fatesolo.model" /> <property name ="mapperLocations" value ="classpath:mapper/*Mapper.xml" /> </bean > <bean class ="org.mybatis.spring.mapper.MapperScannerConfigurer" > <property name ="basePackage" value ="com.fatesolo.mapper" /> <property name ="sqlSessionFactoryBeanName" value ="sqlSessionFactory" /> </bean > <bean id ="txManager" class ="org.springframework.jdbc.datasource.DataSourceTransactionManager" > <property name ="dataSource" ref ="dataSource" /> </bean > <tx:annotation-driven transaction-manager ="txManager" /> </beans >
6) 发现缺少相关class,再打开build.gradle,加入如下依赖:1 compile 'org.springframework:spring-jdbc:4.2.4.RELEASE'
compile 'org.mybatis:mybatis:3.2.0'
compile 'org.mybatis:mybatis-spring:1.2.1'
至此,Spring、SpringMVC、Mybatis已经配置并整合完毕。
5. 实现具体功能 1) 这里以对用户的增删改查为例,首先在MySQL数据库中创建数据库与表,并编写对应的实体类,这里只给出实体类User的代码:1 2 3 4 5 6 7 8 9 10 11 12 13 14 15 16 17 18 19 20 21 22 23 24 25 26 27 28 29 30 31 32 33 34 35 36 37 38 39 40 41 42 43 44 45 46 47 48 49 50 51 52 53 54 55 56 57 58 59 60 package com.fatesolo.model;public class User int id; String name; String url; int age; String info; public int getId () return id; } public void setId (int id) this .id = id; } public String getName () return name; } public void setName (String name) this .name = name; } public String getUrl () return url; } public void setUrl (String url) this .url = url; } public int getAge () return age; } public void setAge (int age) this .age = age; } public String getInfo () return info; } public void setInfo (String info) this .info = info; } @Override public String toString () return "User [id = " + id + ", name = " + name + ", url = " + url + ", age = " + age + ", info = " + info + "]" ; } }
2) 创建对用户表的数据访问接口UserMapper1 2 3 4 5 6 7 8 9 10 11 12 13 14 15 16 17 18 19 package com.fatesolo.mapper;import com.fatesolo.model.User;import java.util.List;public interface UserMapper void save (User user) boolean update (User user) boolean delete (int id) User findById (int id) ; List<User> findAll () ; }
3) 在src/main/resources/mapper中创建与UserMapper.java对应的UserMapper.xml1 2 3 4 5 6 7 8 9 10 11 12 13 14 15 16 17 18 19 20 21 22 23 24 25 26 <?xml version="1.0" encoding="UTF-8"?> <!DOCTYPE mapper PUBLIC "-//mybatis.org//DTD Mapper 3.0//EN" "http://mybatis.org/dtd/mybatis-3-mapper.dtd"> <mapper namespace ="com.fatesolo.mapper.UserMapper" > <insert id ="save" parameterType ="User" > insert into user(name, age, info) values(#{name}, #{age}, #{info}) </insert > <update id ="update" parameterType ="User" > update user set name = #{name}, url = #{url}, age = #{age}, info = #{info} where id = #{id} </update > <delete id ="delete" parameterType ="int" > delete from user where id = #{id} </delete > <select id ="findById" parameterType ="int" resultType ="User" > select id, name, url, age, info from user where id = #{id} </select > <select id ="findAll" resultType ="User" > select id, name, url, age, info from user </select > </mapper >
4) 创建IUserService接口1 2 3 4 5 6 7 8 9 10 11 12 13 14 15 16 17 18 19 package com.fatesolo.service;import com.fatesolo.model.User;import java.util.List;public interface IUserService void save (User user) boolean update (User user) boolean delete (int id) User findById (int id) ; List<User> findAll () ; }
5) 在service中创建impl子包,并创建UserService类实现IUserService接口1 2 3 4 5 6 7 8 9 10 11 12 13 14 15 16 17 18 19 20 21 22 23 24 25 26 27 28 29 30 31 32 33 34 35 36 37 38 39 40 41 42 43 44 45 package com.fatesolo.service.impl;import com.fatesolo.mapper.UserMapper;import com.fatesolo.model.User;import com.fatesolo.service.IUserService;import org.springframework.stereotype.Service;import org.springframework.transaction.annotation.Transactional;import javax.annotation.Resource;import java.util.List;@Service @Transactional (rollbackFor = Exception.class)public class UserService implements IUserService @Resource UserMapper mapper; @Override public void save (User user) mapper.save(user); } @Override public boolean update (User user) return mapper.update(user); } @Override public boolean delete (int id) return mapper.delete(id); } @Override public User findById (int id) return mapper.findById(id); } @Override public List<User> findAll () return mapper.findAll(); } }
6) 创建控制器类UserController1 2 3 4 5 6 7 8 9 10 11 12 13 14 15 16 17 18 19 20 21 22 23 24 package com.fatesolo.controller;import com.fatesolo.service.IUserService;import org.springframework.web.bind.annotation.PathVariable;import org.springframework.web.bind.annotation.RequestMapping;import org.springframework.web.bind.annotation.RequestMethod;import org.springframework.web.bind.annotation.RestController;import javax.annotation.Resource;@RestController @RequestMapping ("/user" )public class UserController @Resource IUserService service; @RequestMapping (value = "/{id}" , method = RequestMethod.GET) public String find (@PathVariable("id" ) String id) return service.findById(Integer.parseInt(id)).toString(); } }
可以看到,这里实现了一个最简单的RESTful风格的方法。至此完成了全部的具体逻辑的实现。
6. 项目运行 1) 打开build.gradle,添加最后的项目依赖:1 compile 'mysql:mysql-connector-java:5.1.8'
compile 'log4j:log4j:1.2.16'
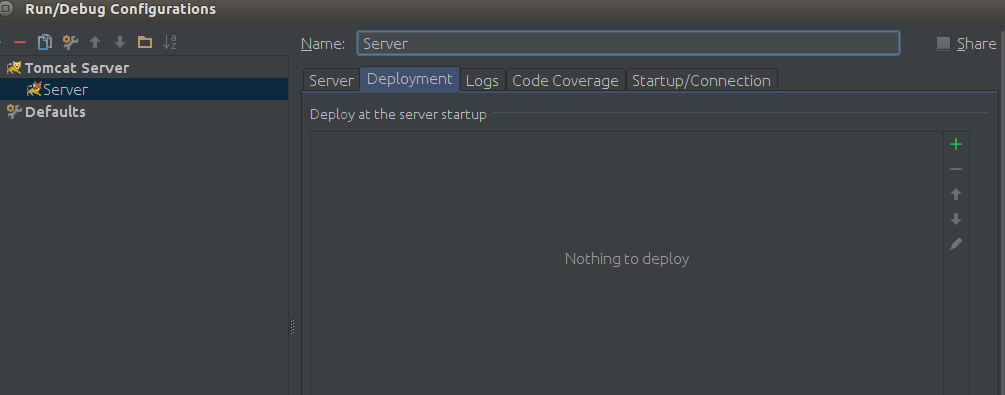
2) 点击Run菜单栏的Edit Configurations,点击绿色加号添加一个Tomcat Server,如图:
3) 点击右侧绿色加号,选择Artifacts,点击确定。
4) 在MySQL中,选择TestDB,在user表中添加一条任意数据。
5) 运行Tomcat,访问http://localhost:8080/user/id/ ,注意id应该改成你刚才添加的数据的id数字。这里以1为例,得到如图结果:
作者 [@FateSolo]