项目地址:
https://github.com/FateSolo/Dubbo-Test
目录:
- 0. 序
- 1. Maven构建项目
- 2. Gradle构建项目
- 3. 搭建Spring + Dubbo框架
- 4. 支持RESTful Remoting
- 5. Dubbo服务集群
- 6. ZooKeeper集群
- 7. Nginx + Tomcat集群
- 8. Redis共享session
经过前几章的集群配置,现如今整个项目流程如下:
1) 访问本机80端口,Nginx反向代理至Tomcat集群中,负载均衡策略为权重比,共有两个节点。
2) 其中一个dubbo-client接收请求,通过注册中心发现服务,注册中心使用ZooKeeper集群实现,共有三个节点。
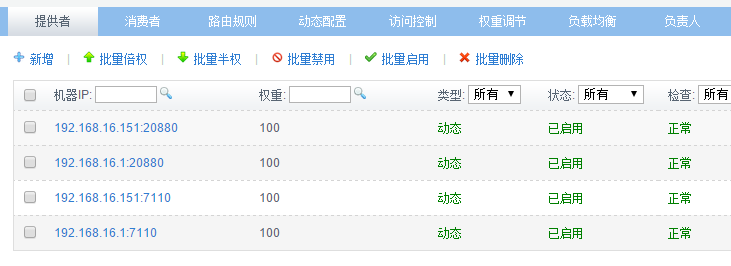
3) 发现并调用服务dubbo-server,该服务共有两个节点。
目前存在的问题:
1) Tomcat集群没有Session共享策略。
2) dubbo-server没有做数据持久化。
因此,在虚拟机端部署一个Redis,解决session共享问题。同时为了方便,不再部署MySQL,直接使用Redis作为数据存储,项目整体架构图如下: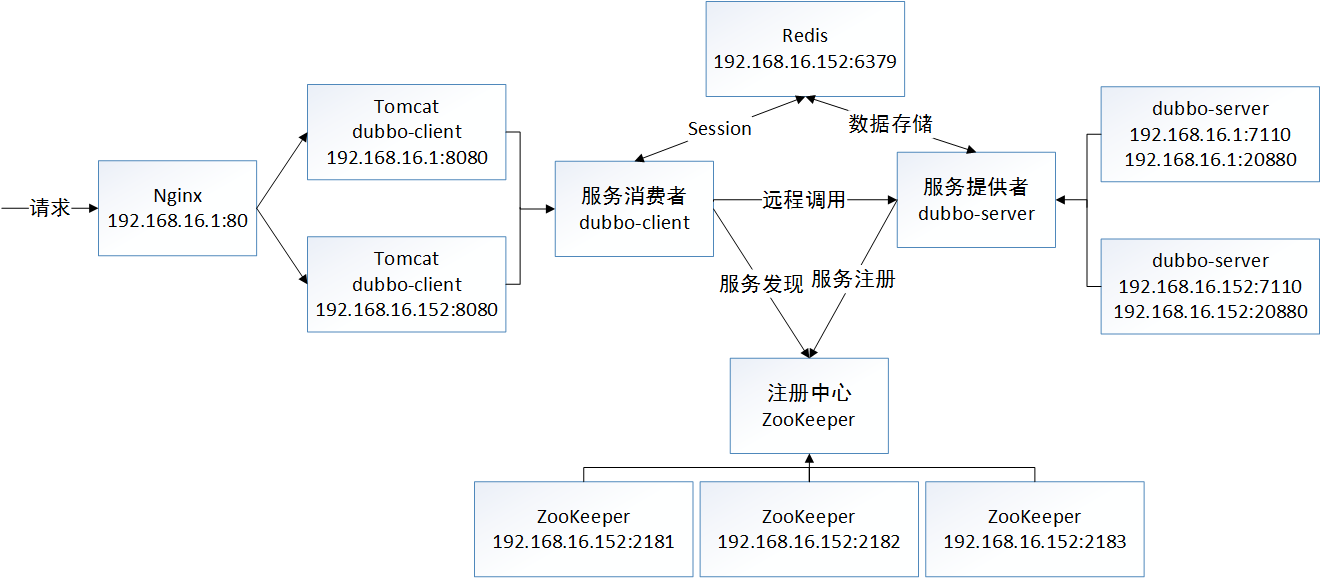
1. 部署Redis:
1) 在Redis官网下载稳定版Redis。
2) 解压并编译:1
2
3tar -vxzf redis-3.2.9.tar.gz
cd redis-3.2.9
make
3) 打开redis.conf,寻找对应配置项并作如下修改:1
2
3bind 192.168.16.152 127.0.0.1
daemonize yes
requirepass 123456
其意思分别是支持远程连接、后台运行和使用密码。
4) 键入如下命令启动Redis:1
./src/redis-server redis.conf
并使用客户端进入调试:1
./src/redis-cli -a 123456
2. Redis数据持久化:
1) 打开dubbo-parent下的build.gradle,添加spring-data-redis和jedis的依赖:1
2compile 'org.springframework.data:spring-data-redis:1.8.4.RELEASE'
compile 'redis.clients:jedis:2.9.0'
2) 在dubbo-server的META-INF目录下创建db文件夹,并创建配置文件db.properties,编写如下配置:1
2
3
4
5
6
7
8redis.host=127.0.0.1
redis.port=6379
redis.pass=123456
redis.maxIdle=5
redis.maxTotal=30
redis.maxWait=1000
redis.testOnBorrow=true
3) 打开dubbo-server.xml,增加如下配置:1
<context:property-placeholder location="classpath:META-INF/db/db.properties"/>
即加载db.properties的配置。
4) 增加configuration子包,并创建Redis配置类RedisConfiguration:1
2
3
4
5
6
7
8
9
10
11
12
13
14
15
16
17
18
19
20
21
22
23
24
25
26
27
28
29
30
31
32
33
34
35
36
37
38
39
40
41
42
43
44
45
46
47
48
49
50
51
52
53
54
55
56
57
58
59
60
61
62
63
64
65
66
67
68
69
70
71
72package com.fatesolo.dubbo.server.configuration;
import org.springframework.beans.factory.annotation.Value;
import org.springframework.context.annotation.Bean;
import org.springframework.context.annotation.Configuration;
import org.springframework.data.redis.connection.RedisConnectionFactory;
import org.springframework.data.redis.connection.jedis.JedisConnectionFactory;
import org.springframework.data.redis.core.RedisTemplate;
import org.springframework.data.redis.serializer.JdkSerializationRedisSerializer;
import org.springframework.data.redis.serializer.StringRedisSerializer;
import redis.clients.jedis.JedisPoolConfig;
@Configuration
public class RedisConfiguration {
@Value("${redis.host}")
private String host;
@Value("${redis.port}")
private int port;
@Value("${redis.pass}")
private String pass;
@Value("${redis.maxIdle}")
private int maxIdle;
@Value("${redis.maxTotal}")
private int maxTotal;
@Value("${redis.maxWait}")
private int maxWait;
@Value("${redis.testOnBorrow}")
private boolean testOnBorrow;
@Bean
public JedisPoolConfig jedisPoolConfig() {
JedisPoolConfig jedisPoolConfig = new JedisPoolConfig();
jedisPoolConfig.setMaxIdle(maxIdle);
jedisPoolConfig.setMaxTotal(maxTotal);
jedisPoolConfig.setMaxWaitMillis(maxWait);
jedisPoolConfig.setTestOnBorrow(testOnBorrow);
return jedisPoolConfig;
}
@Bean
public RedisConnectionFactory redisConnectionFactory(JedisPoolConfig jedisPoolConfig) {
JedisConnectionFactory redisConnectionFactory = new JedisConnectionFactory();
redisConnectionFactory.setHostName(host);
redisConnectionFactory.setPort(port);
redisConnectionFactory.setPassword(pass);
redisConnectionFactory.setPoolConfig(jedisPoolConfig);
return redisConnectionFactory;
}
@Bean
public RedisTemplate<String, Object> redisTemplate(RedisConnectionFactory redisConnectionFactory) {
RedisTemplate<String, Object> redisTemplate = new RedisTemplate<>();
redisTemplate.setConnectionFactory(redisConnectionFactory);
redisTemplate.setKeySerializer(new StringRedisSerializer());
redisTemplate.setValueSerializer(new JdkSerializationRedisSerializer());
return redisTemplate;
}
}
5) 在dao.impl包中创建基于Redis的实现类BookDaoRedisImpl:1
2
3
4
5
6
7
8
9
10
11
12
13
14
15
16
17
18
19
20
21
22
23
24
25
26
27
28
29
30
31
32
33
34
35
36package com.fatesolo.dubbo.server.dao.impl;
import com.fatesolo.dubbo.api.bean.Book;
import com.fatesolo.dubbo.server.dao.BookDao;
import org.springframework.data.redis.core.RedisTemplate;
import org.springframework.stereotype.Repository;
import javax.annotation.Resource;
import java.util.List;
@Repository
public class BookDaoRedisImpl implements BookDao {
@Resource
private RedisTemplate<String, Book> redisTemplate;
@Override
public Book findById(int id) {
return redisTemplate.opsForValue().get("book." + id);
}
@Override
public List<Book> findAll() {
return redisTemplate.opsForValue().multiGet(redisTemplate.keys("book.*"));
}
@Override
public void save(Book book) {
int id = redisTemplate.keys("book.*").size() + 1;
book.setId(id);
redisTemplate.opsForValue().set("book." + id, book);
}
}
6) 打开BookServiceImpl,为BookDao注入新实现类:1
2@Resource(name = "bookDaoRedisImpl")
private BookDao bookDao;
3. Redis共享Session:
1) 打开dubbo-client下的build.gradle,添加spring-session-data-redis的依赖:1
compile 'org.springframework.session:spring-session-data-redis:1.3.1.RELEASE'
2) 在dubbo-client的config目录下创建db文件夹和配置文件db.properties,配置同dubbo-server。
3) 打开spring-common.xml,增加如下配置:1
2
3<context:property-placeholder location="classpath:config/db/db.properties"/>
<import resource="spring-redis.xml"/>
在dubbo-server中使用Java Config的方式配置Redis,在dubbo-client则使用xml的方式配置。
4) 创建spring-redis.xml,编写如下配置:1
2
3
4
5
6
7
8
9
10
11
12
13
14
15
16
17
18
19
20
21
22
23
24
25
26
27<?xml version="1.0" encoding="UTF-8"?>
<beans xmlns="http://www.springframework.org/schema/beans"
xmlns:xsi="http://www.w3.org/2001/XMLSchema-instance"
xsi:schemaLocation="http://www.springframework.org/schema/beans
http://www.springframework.org/schema/beans/spring-beans.xsd">
<bean id="jedisPoolConfig" class="redis.clients.jedis.JedisPoolConfig">
<property name="maxIdle" value="${redis.maxIdle}"/>
<property name="maxTotal" value="${redis.maxTotal}"/>
<property name="maxWaitMillis" value="${redis.maxWait}"/>
<property name="testOnBorrow" value="${redis.testOnBorrow}"/>
</bean>
<bean id="redisConnectionFactory"
class="org.springframework.data.redis.connection.jedis.JedisConnectionFactory">
<property name="hostName" value="${redis.host}"/>
<property name="port" value="${redis.port}"/>
<property name="password" value="${redis.pass}"/>
<property name="poolConfig" ref="jedisPoolConfig"/>
</bean>
<bean id="redisHttpSessionConfiguration"
class="org.springframework.session.data.redis.config.annotation.web.http.RedisHttpSessionConfiguration">
<property name="maxInactiveIntervalInSeconds" value="60"/>
</bean>
</beans>
这里将Session过期时间定为一分钟。
5) 打开web.xml,增加如下配置:1
2
3
4
5
6
7
8
9
10<!-- Session -->
<filter>
<filter-name>springSessionRepositoryFilter</filter-name>
<filter-class>org.springframework.web.filter.DelegatingFilterProxy</filter-class>
</filter>
<filter-mapping>
<filter-name>springSessionRepositoryFilter</filter-name>
<url-pattern>/*</url-pattern>
</filter-mapping>
注意该配置的位置要在所有filter之前。
6) 打开BookController,修改getInfo方法:1
2
3
4
5
6
7
8
9
10
11@RequestMapping(value = "/info", method = RequestMethod.GET)
public String getInfo(HttpServletRequest request) {
Object sessionInfo = request.getSession().getAttribute("info");
if (sessionInfo == null) {
request.getSession().setAttribute("info", "Session : " + request.getLocalAddr());
return "No Session<br/>" + request.getLocalAddr();
}
return sessionInfo + "<br/>" + request.getLocalAddr();
}
4. 项目测试:
1) 按照上一章的方式分别部署ZooKeeper、dubbo-server、dubbo-client、Nginx。
注意部署本机端时要修改db.properties的host为192.168.16.152。
2) 测试dubbo-server的数据持久化。
添加一条数据:1
curl -d "name=Book1&author=Fate" http://192.168.16.1/dubbo-client/book
在Redis的客户端中查看:1
keys *
显示如下:1
book.1
连续访问http://192.168.16.1/dubbo-client/book ,固定得到如下结果:1
[{"id":1,"name":"Book1","author":"Fate"}]
至此Redis数据持久化测试成功。
3) 测试dubbo-client的Session共享策略。
访问http://192.168.16.1/dubbo-client/book/info ,显示如下:1
No Session
192.168.16.1
连续访问,结果如下:1
Session : 192.168.16.1
192.168.16.1
或1
Session : 192.168.16.1
192.168.16.152
等待一分钟,关闭本机端的Tomcat,再次访问,显示如下:1
No Session
192.168.16.152
连续访问,结果如下:1
Session : 192.168.16.152
192.168.16.152
至此Redis共享Session测试成功。
作者 [@FateSolo]
2017 年 06月 06日